Sunday, March 8, 2015

OpenStack - Projects, Users And Roles


As an OpenStack System Administrator, it is common to have new tenants.  To create new project, log into OpenStack (I am using my DevStack environment) as the admin user and select "Users" under the Identity Panel (on the left-hand side)


Click on the "Create User" button and fill in the required information on the pop-up window.


Click on the "+" button for the "Primary Project" field to create new project for the new user and fill in the Project Information.  Click on the "Create Project" button to create the new project.


We will see the green box on the top right-hand corner of the screen which says that the new project has been created.


The default role for the new user is "member".  We can select different roles for the users, e.g. admin based on our needs.  In my case, I have left it as member.


Next, go back to the Identity Panel and select the Project tab.  We should see the new project, i.e. Test1 on the project list now.


Select "Edit Project" for the newly created project and check that the new user is shown in the "Project Members" tab:


Lastly, check that you can log into Horizon using the new user.  You should see that you are inside the new project, i.e. Test1 in my case:


In this way you will be able to manage new tenants =)

Sunday, February 15, 2015

OpenStack - How to Access VM using SSH Key Pairs


I will demonstrate how to SSH to VM using SSH Key Pairs in this post.  This is very useful as it allows us to access the VM without keying in password.

The first step will be to log into the OpenStack environment (I am using DevStack for this post) and go to Access & Security -> Key Pairs


Next, click on the "Create Key Pair" button and give a name to the Key Pair:


Click on the "Create Key Pair" button to create the key pair and download the pem file (it will be key1.pem in my case)


Next, move the pem file that you have downloaded to the DevStack server and change its read/write permission (I have created a folder called 'keys' to store my private keys):

stack@DevStack:~/keys$ pwd
/home/stack/keys
stack@DevStack:~/keys$ chmod 600 key1.pem 
stack@DevStack:~/keys$ ll
total 12
drwxrwxr-x 2 stack stack 4096 Feb 15 18:38 ./
drwxr-xr-x 8 stack stack 4096 Feb 15 19:06 ../
-rw------- 1 stack stack 1675 Feb 15 18:38 key1.pem

stack@DevStack:~/keys$ 


The next step will be to create a test VM (you can refer to my earlier post on how to create test VM if you need more information). The only difference in this case is we need to make sure "Key1" is selected as the Key Pair under the Access & Security tab when we create the test VM:


After the VM is created, we need to assign floating IP to it so that we can access it from the public network (you can refer to my earlier post if you need more information on how to do that).  Once we have performed the required steps, we should see something like this in the Instances tab (notice that the Key Pair column shows "Key1", which was what I have chosen during VM creation):


Next, we will go to the folder with the pem file and SSH to our VM using its floating IP:


In this way, you will be able to SSH to the VM without providing password =)


Monday, February 2, 2015

OpenStack - How to Create New Network, Add Access & Security Rules and Assign Floating IP to VM


One of my friends mentioned to me that I did not include a write-up on how to assign floating IPs to VMs.  

I will make use of the DevStack environment that was created earlier for this purpose (you can look at the following link to set up your DevStack environment).

We will log into Horizon Dashboard as "Demo" User and navigate to Network Topology (Project -> Network -> Network Topology).  We can see that a "public" and "private" network were created as part of DevStack installation.  A public router connects both networks together so that the VM on the "private" network can be accessed via the public network (Network Topology is very handy for observing overall network structure).


I will not use the default networks but will instead create a new network, i.e. "Test Network". 

Click on "Networks" to see the available networks.  We will only see the "private" network that was created during installation.


Create a new Network by clicking on the "Create Network" button.  Fill in the required information based on your preference.  I have created a basic network as shown below (DHCP enabled):


Click on the blue "Create" button to create the network.  "Test Network" will be created after that.


Next, create a test VM on our newly created network (you can refer to my previous posts if you have problems creating one).  We can see that the test VM, i.e. TestVM2 gets assigned with IP 30.30.30.2


We will want to attach the newly created network to the public router so that TestVM2 can be accessed from public network. 

Click on the "Routers" tab on the left to look at the available routers in our network.  In my case, I only have "router1" defined in my network.  Click on "router1". Next, click on "Add Interface" and select "Test Network". 


Once this is done, we will see from Network Topology that both "private" and "Test Network" are now connected to the public network


By default, we will not be able to ping or SSH to the VMs.  In order to ping or SSH to the VMs, we will need to make changes to the Access & Security rules. 

Go to the Access & Security tab and click on the "Manage Rules" button for the default Security Group


We will see the default rules. Click on the "Add Rule" button to enable ICMP and SSH.


You should have the following rules after this:


Next, we want to allocate floating IP to the "demo" project so that we can assign floating IP to the test VM.

Go to Access & Security tab and click on "Floating IPs" tab.  We will see that the project does not has any floating IPs allocated to it.  Click on the "Allocate IP To Project" button.


Next, click on the "Allocate IP" button to allocate 1 IP from the pool to our project


We see that 172.24.4.3 is assigned to us


The next step will be to associate this IP with the TestVM2 that we created earlier.  But before that, we will first do a ping test to confirm that we cannot reach the 30.30.30.0/24 network.


Now, we will assign the floating IP 172.24.4.3 to our VM.  Go to the "Instances" tab and click on "Associate Floating IP" under the "Actions" column.  Select the floating IP Address and click the "Associate" button. 


The port on TestVM2 (with IP address 30.30.30.2) will be associated with floating IP 172.24.4.3


Check that you are able to ping TestVM2:


Check that you are able to SSH to TestVM2:


Hopefully it is useful for you guys =)


Sunday, February 1, 2015

OpenStack (Juno) - DevStack Installation Using VirtualBox (with Neutron), VM Creation and Console Access


This is my 2nd post on OpenStack and I am going to install DevStack (with Neutron) on my Ubuntu Virtual Machine (my 1st post was on OpenStack installation using Mirantis Fuel 6.0)

The Host Machine that I will be using this time is a MacBook Pro running on OS X Yosemite (version 10.10.2) with i-7 quad-core processor and 16 GB RAM.

You will need VirtualBox (https://www.virtualbox.org/wiki/Downloads) and Ubuntu 14.04 ISO image (https://help.ubuntu.com/community/Installation/MinimalCD) for this installation. While I am using OS X, the installation procedures will be similar for a Windows Host machine (I have used VirtualBox 4.3.20 and Ubuntu 14.04 minimal CD (64-bit PC) for this post)


Steps:

1) Create Ubuntu VM using VirtualBox. I have assigned 8 GB RAM, 4 CPU Cores and 250GB to my VM (you can assign resources according to your needs but I feel that it will be good to assign at least 4GB of RAM, 50GB of storage space and 2 CPU Cores for decent performance). We will use the default Adapter 1 (NAT) that is defined in VirtualBox.


I selected "Basic Ubuntu Server" and "OpenSSH Server" for Ubuntu installation (press space bar to select the option)


I also created a default user and named it "stack" - I will use this user account to install DevStack (you are free to use any user name, it need not be stack)

Follow through the installation instructions to install Ubuntu on the VM


2) Once the installation is completed, click on Settings
-> Network on VirtualBox to arrive at this screen:


Click on the "Port Forwarding" button and you will see an empty table. Click on the green color '+' icon on the right side of the window to create a new entry for SSH. Fill in the data as follows so that we can SSH to the Ubuntu VM from the Mac Host Machine (you can use any port that is available in your system, I chose port 2220 in this case):


Open a terminal window in the Mac Host machine (you can install and use MobaXterm for this purpose if you are using a Windows Host Machine). Key in the following command (note that the port number depends on what you set above) to log into the Ubuntu VM (the username and password will be whatever you have defined during the earlier installation):


$ ssh -p 2220 stack@127.0.0.1


Since we are using NAT, we will have internet connections on this VM as long as the Mac Host machine is connected to the internet (note that we need internet connections in order to proceed with the installation).


3) I will be installing Juno release. Start by downloading DevStack to the Ubuntu VM:

$ sudo apt-get install git -y
$ git clone -b stable/juno https://git.openstack.org/openstack-dev/devstack
$ cd devstack

Create a local.conf file in the devstack folder
$ touch local.conf

Change the read/write permission of the file so that it can be accessed by the system
$ chmod 664 local.conf

Edit the local.conf file (see below for my configurations). You can make changes to the localrc file based on your needs. I have set 'stack' as my admin password and am installing most of the OpenStack projects, including trove. I have decided to use GRE Tunnel for my Neutron Networks (you can use other setting, e.g. VLAN or VXLAN).

[[local|localrc]]
ADMIN_PASSWORD=stack
SERVICE_TOKEN=$ADMIN_PASSWORD
MYSQL_PASSWORD=$ADMIN_PASSWORD
RABBIT_PASSWORD=$ADMIN_PASSWORD
SERVICE_PASSWORD=$ADMIN_PASSWORD

# Branch
GLANCE_BRANCH=stable/juno
HORIZON_BRANCH=stable/juno
KEYSTONE_BRANCH=stable/juno
NOVA_BRANCH=stable/juno
NEUTRON_BRANCH=stable/juno
HEAT_BRANCH=stable/juno
CEILOMETER_BRANCH=stable/juno
TROVE_BRANCH=stable/juno

# Services
ENABLED_SERVICES=rabbit,mysql,key
ENABLED_SERVICES+=,n-api,n-crt,n-obj,n-cpu,n-cond,n-sch,n-novnc,n-cauth 
ENABLED_SERVICES+=,s-proxy,s-object,s-container,s-account 
ENABLED_SERVICES+=,g-api,g-reg 
ENABLED_SERVICES+=,cinder,c-api,c-vol,c-sch,c-bak 
ENABLED_SERVICES+=,trove,tr-api,tr-tmgr,tr-cond
ENABLED_SERVICES+=,horizon

# Ceilometer
ENABLED_SERVICES+=,ceilometer-acompute,ceilometer-acentral,ceilometer-collector,ceilometer-api
ENABLED_SERVICES+=,ceilometer-alarm-notify,ceilometer-alarm-eval

# Heat
ENABLED_SERVICES+=,heat,h-api,h-api-cfn,h-api-cw,h-eng

# Neutron
DISABLED_SERVICES=n-net
ENABLED_SERVICES+=,q-svc,q-agt,q-dhcp,q-l3,q-meta,q-metering,neutron

# Neutron - Load Balancing
ENABLED_SERVICES+=,q-lbaas

# VLAN configuration
Q_PLUGIN=ml2
ENABLE_TENANT_VLANS=True

# GRE tunnel configuration
Q_PLUGIN=ml2
ENABLE_TENANT_TUNNELS=True
Q_ML2_TENANT_NETWORK_TYPE=gre

# Logging
LOGFILE=$DEST/logs/stack.sh.log
SCREEN_LOGDIR=$DEST/logs/screen
LOGDAYS=2

# Swift
SWIFT_HASH=66a3d6b56c1f479c8b4e70ab5c2000f5
SWIFT_REPLICAS=1 
SWIFT_DATA_DIR=$DEST/data

# Tempest
enable_service tempest


Run the following command to start the deployment of devstack (the script is located in the devstack folder):
$ ./stack.sh

The installation will take some time and when it is completed, you will see the IP address of the Horizon Dashboard (it is 10.0.2.15 in my case): 


4) In order to access the Horizon Dashboard and console of the VM, we will need to enable port-forwarding on port 80 (HTTP) and port 6080 (for VNC Console) for Adapter 1. I have mapped it to port 2221 and 6080 on my Mac Host Machine respectively.


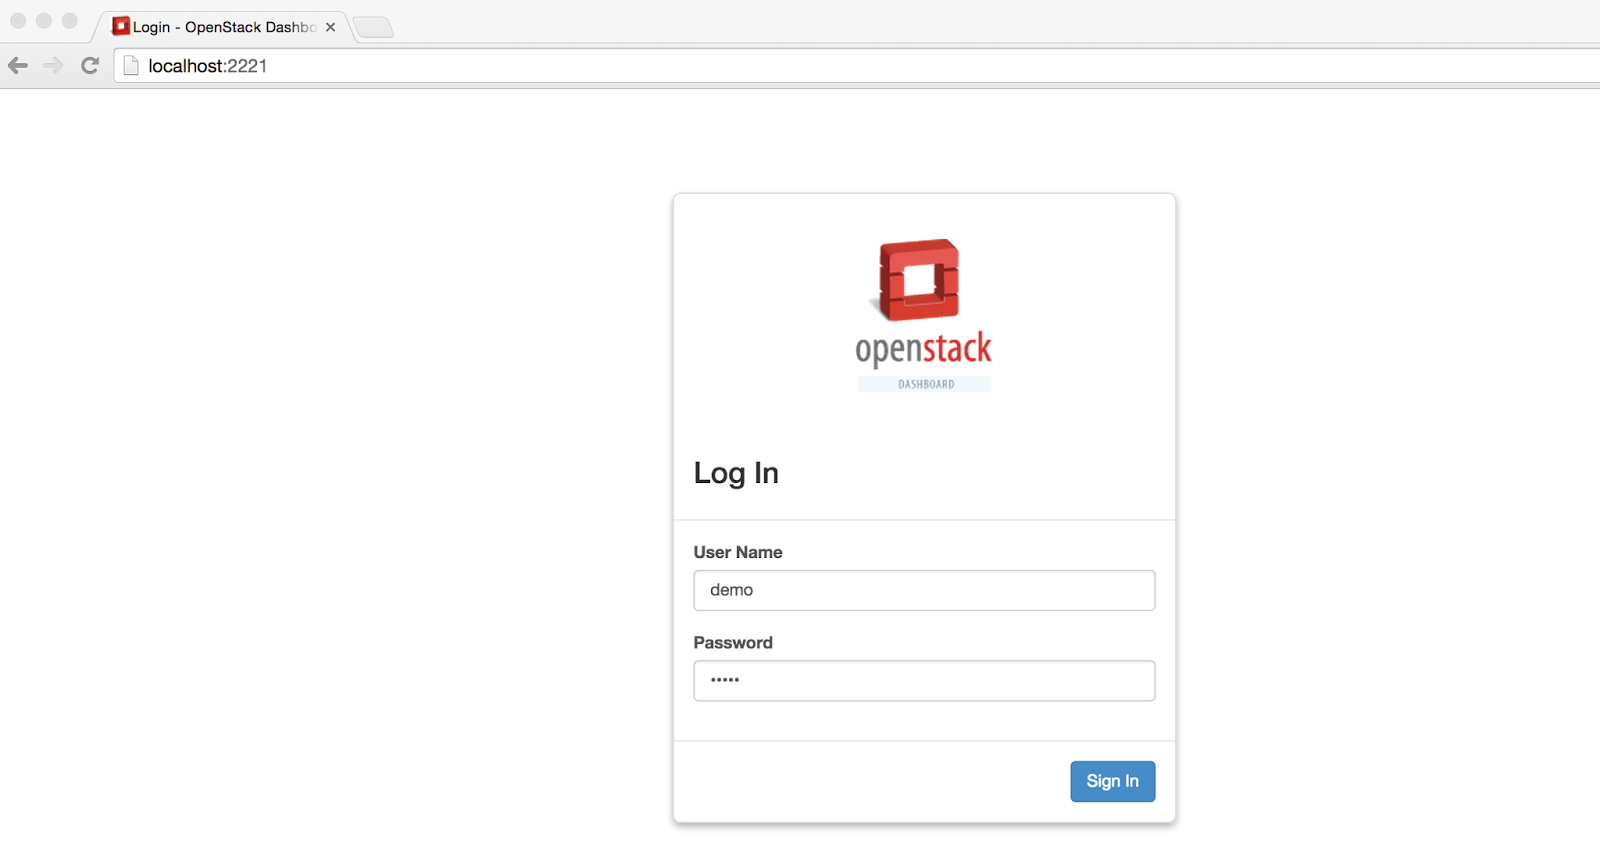
Key in "http://localhost:2221" for your web browser (I am using Firefox; it will work for other browsers too, e.g. Google Chrome) to arrive at the Horizon login page. Log in using the credentials for demo user (the password will be 'stack' in my case):


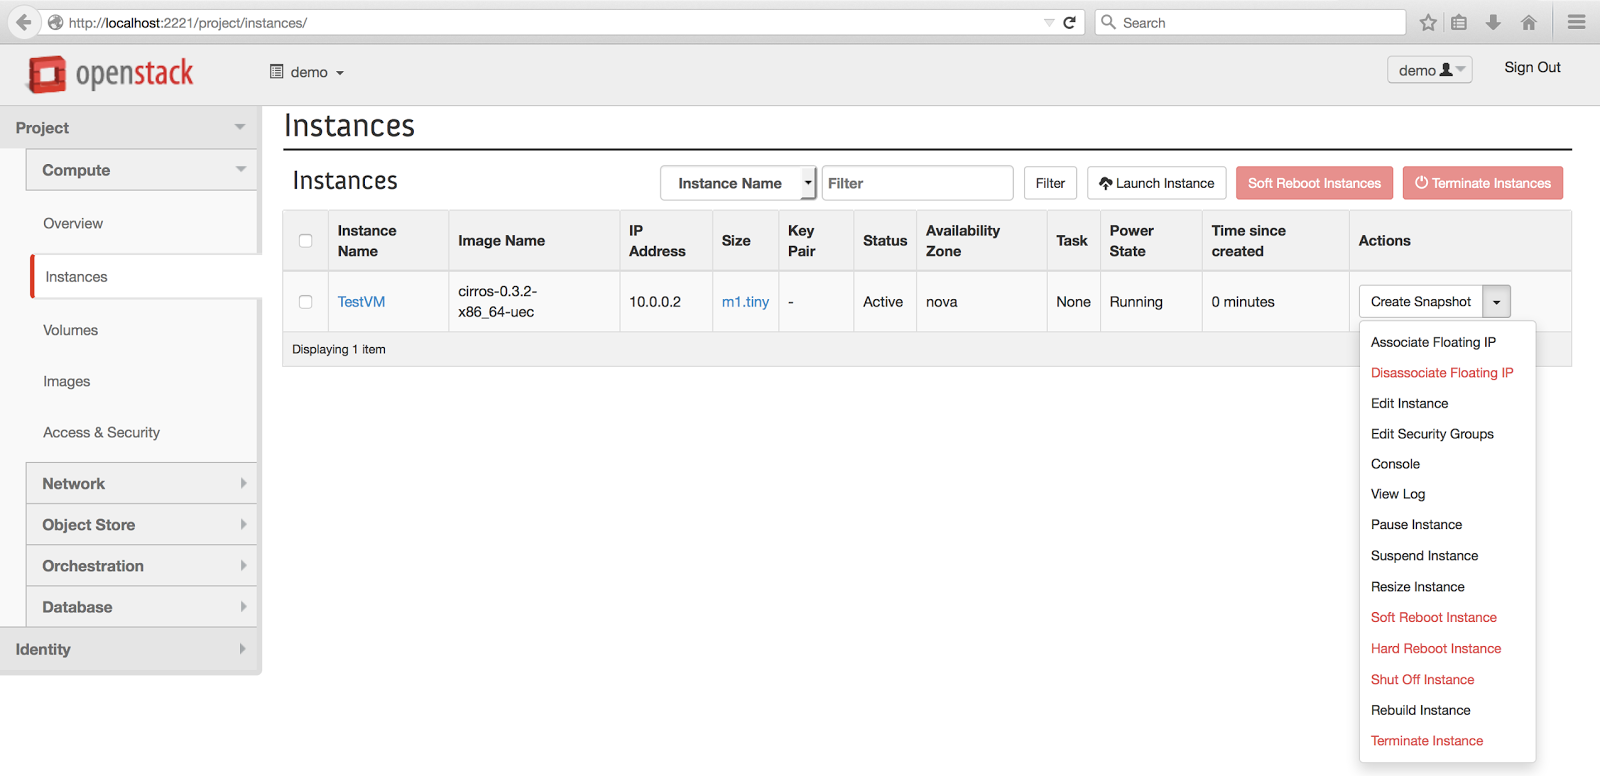
Fill in the information for VM creation and click on the launch button (you can look at my 1st post if you have problems locating the "Launch Instance" button)


After the VM becomes active, click on "Actions" and you will see a drop-down list. Click on "Console".


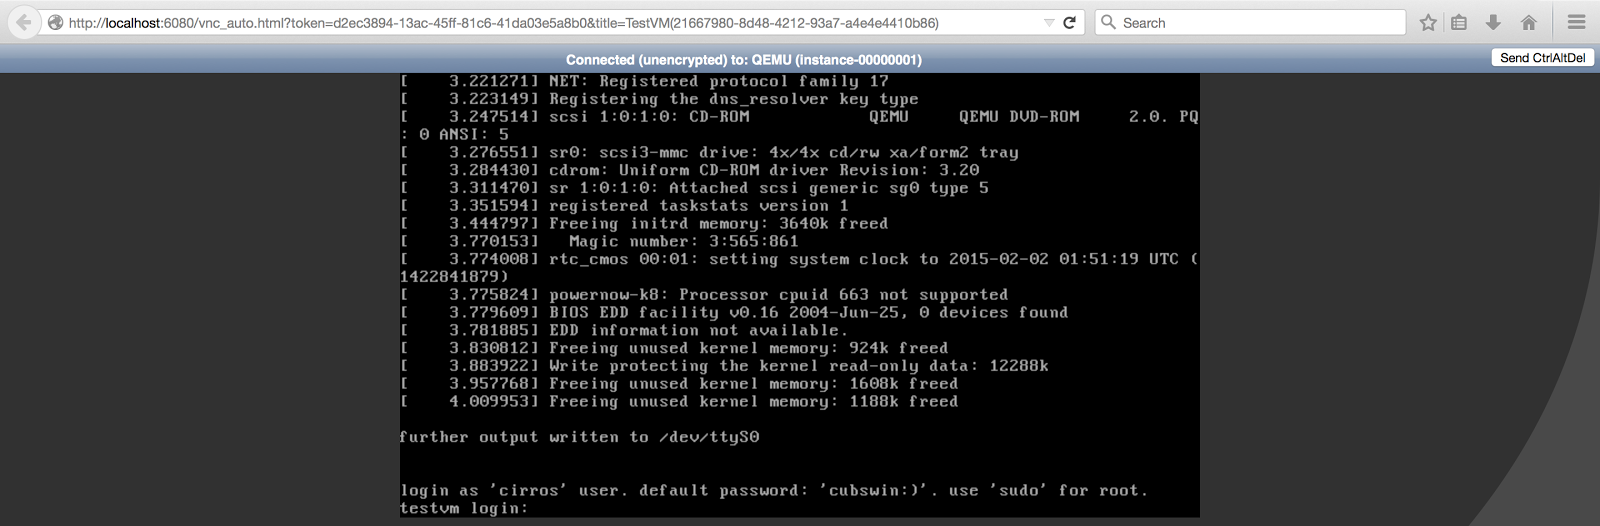
We will see the "Instance Console" window. However, we will not be able to load the Console as it is port-forwarded to 6080 on our local host machine. We can open the link to the console in another tab with port forward to 6080.


The new tab will have the URL starting with "10.0.2.15:6080" (which is the Controller IP for my DevStack). We need to change this to "localhost:6080" instead. In this way, we will be able to access the console of the Test VM.


Cheers!


Other Related Posts:

Click here if you want to understand more about the OpenStack Tacker hands-on lab that my friend and I presented in the OpenStack Summit 2016 (Austin)  

Click here if you want to set up OpenStack (Juno) + OpenContrail (SDN) using Mirantis Fuel 6.1
Click here if you want to install OpenStack (Juno) using Mirantis Fuel 6.0

Click here if you want to install OpenStack Tacker (VNF) on DevStack
Click here if you want to spin Ubuntu VM and Preserve your DevStack environment
Click here if you want to create new networks, change security rules and/or assign floating IPs to VMs
Click here if you want to access VM using SSH Key Pairs
Click here if you want to manage project, user, role